In today’s world, staying connected to the internet is essential. With most of our devices being connected to the internet, it’s crucial to ensure that our Wi-Fi connection is strong and stable. One of the factors that affect the Wi-Fi connection is the frequency or GHz of the network. In this digital age, most devices are equipped with Wi-Fi technology that operates at either 2.4GHz or 5GHz. If you’re using an Android device, checking the frequency of your Wi-Fi connection is easy.
How to check wifi Ghz on android? [Easy Steps]
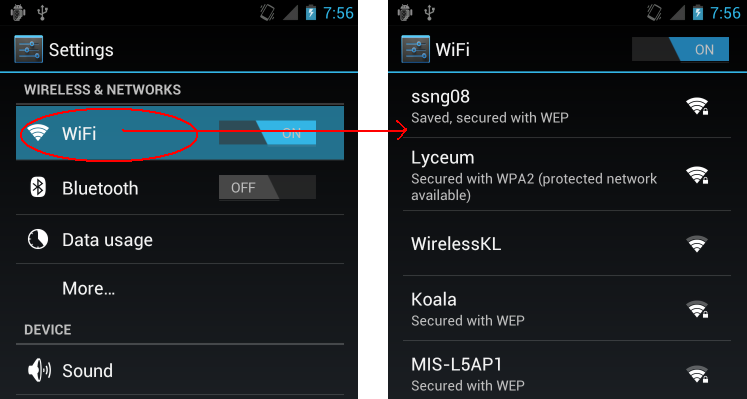
- Open the “Settings” app on your Android device.
- Navigate to the “Wi-Fi” settings.
- Tap on the three dots in the upper-right corner of the screen to access the “Advanced” settings.
- Look for the “Wi-Fi frequency band” option, and it will display the GHz of your Wi-Fi connection.
It’s as simple as that! By following these four easy steps, you can check the GHz of your Wi-Fi connection on your Android device.
If you’re not sure which GHz your device is using, checking the Wi-Fi GHz is crucial to ensure that you have a stable and fast internet connection. By checking the GHz, you can also determine if you need to switch to a different Wi-Fi frequency band for better connectivity.
When it comes to connecting to the internet on an Android device, it’s essential to have a stable and fast Wi-Fi connection. Checking the GHz of your Wi-Fi connection can help you determine whether you have the optimal frequency band for your device. Most devices operate at either 2.4GHz or 5GHz, and switching between the two can significantly impact your internet connectivity.
To check the Wi-Fi GHz on your Android device, it’s crucial to know which version of Android your device is running. Some versions of Android may have slightly different settings or menu options than others. However, the steps outlined in our tutorial will be similar for most Android versions.
How To Set Android Wi-Fi Setting from 2.4 GHz to 5 GHz
Switching from 2.4GHz to 5GHz on your Android device is a simple process. The 5GHz frequency band is typically faster and more stable than 2.4GHz, so if your device is compatible with it, it’s a good idea to switch. However, not all Android devices are capable of using the 5GHz frequency band, so it’s important to check your device’s specifications before attempting to switch.
To set your Android Wi-Fi setting from 2.4GHz to 5GHz, follow these simple steps:
- Open the “Settings” app on your Android device.
- Navigate to the “Wi-Fi” settings.
- Tap and hold on the name of the Wi-Fi network you are connected to, then tap “Modify Network.”
- Tap on the “Advanced Options” or “Show Advanced Options” button.
- Look for the “Frequency Band” or “Band” option and select “5GHz” if it’s available. If 5GHz is not available, your device is not compatible with the frequency band.
- Tap “Save” to apply the changes.
Note that some Android devices may have slightly different settings or menu options, but the steps outlined above will be similar for most devices.
Conclusion
In conclusion, checking the Wi-Fi GHz on your Android device is a crucial step to ensure that you have a stable and fast internet connection. By following the steps mentioned above, you can easily check the GHz of your Wi-Fi connection on your Android device. So, go ahead and give it a try! Don’t forget to check the Wi-Fi GHz on your Android device, and enjoy a better internet connection experience.